🌋 WebIDE 的开发记录其七(DirtyDiff 支持)
!本篇文章过于久远,其中观点和内容可能已经不准确,请见谅!~
dirty 的意思在 Git 中表示当前本地代码与提交版本相比有修改,还没有提交。很多编辑器就会在行号旁边用颜色标识当前行的修改状态,用以提示用户当前文件状态,平时使用的时候是一个很好用的功能。

- diffComputer 用来计算当前文件和 已提交文件的差别(修改、新增和删除)
- 将计算出来的差别转为 decorations 装饰器,将装饰器放到具体的每行里面
- 用户点击 decorations 后打开 peek 视图(OverlayWidget + ViewZone)
- peekView 中显示 diff 编辑器
这个如果让我们自己做的话也是能实现的,但是 monaco-editor 里面已经集成了这个工具:
// 因为我们引入的是 amd 规范的 monaco-editor,这里能直接用 require 引入内部的组件(如果是 webpack 需要单独 import 打包)const diffComputer = require('monaco-editor/esm/vs/editor/common/diff/diffComputer.js');// 具体的计算逻辑const DiffComputer = diffComputer.DiffComputer;// 计算函数const computeDirtyDiff = (originalLines, modifiedModel) => {// 边界条件处理if (!modifiedModel || modifiedModel.getValue() === '') return [];// 获取编辑器当前的实际内容let modifiedLines = modifiedModel.getLinesContent();// 利用内置的计算能力进行输出let diffComputer = new DiffComputer(originalLines, modifiedLines, {shouldComputeCharChanges: false, // 不需要字符级别的差异(行级别和字符级别)shouldPostProcessCharChanges: false, // 后置处理字符差异shouldIgnoreTrimWhitespace: false, // 是否忽略首尾空格差异shouldMakePrettyDiff: true // 调整 diff 更符合直觉});return diffComputer.computeDiff();};
最后得到的结果一个 json 对象描述修改和新增:
[{"originalStartLineNumber": 24,"originalEndLineNumber": 0,"modifiedStartLineNumber": 25,"modifiedEndLineNumber": 25},{"originalStartLineNumber": 31,"originalEndLineNumber": 31,"modifiedStartLineNumber": 32,"modifiedEndLineNumber": 32},{"originalStartLineNumber": 34,"originalEndLineNumber": 0,"modifiedStartLineNumber": 36,"modifiedEndLineNumber": 36},{"originalStartLineNumber": 38,"originalEndLineNumber": 38,"modifiedStartLineNumber": 39,"modifiedEndLineNumber": 0}]
// 获取编辑器一些固定的元素位置const OverviewRulerLane = monaco.editor.OverviewRulerLane;// 定义修改类型const ChangeType = { Modify: 0, Add: 1, Delete: 2 };// decorations 的配置,定义标记应该在的位置const baseOptions = {isWholeLine: true,position: OverviewRulerLane.Left + 2,overviewRuler: {color: 'RGBA(0, 122, 204, 0.6)',position: OverviewRulerLane.Left,}}// 不同的 decorations 有不同的 class name,以便 css 定义样式const modifiedOptions = Object.assign({linesDecorationsClassName: 'dirty-diff-glyph dirty-diff-modified',}, baseOptions);const addedOptions = Object.assign({linesDecorationsClassName: 'dirty-diff-glyph dirty-diff-added',}, baseOptions);const deletedOptions = Object.assign({linesDecorationsClassName: 'dirty-diff-glyph dirty-diff-deleted',}, baseOptions);// 根据不同的数据,能解析为不同的修改类型function getChangeType(change) {if (change.originalEndLineNumber === 0) { // 新增行return ChangeType.Add;} else if (change.modifiedEndLineNumber === 0) { // 删除行return ChangeType.Delete;} else { // 其他的都是修改return ChangeType.Modify;}}// 根据上面的 diffChanges 进行转换const generateDecorations = (changes) => {const decorations = changes.map((change) => {const changeType = getChangeType(change);const startLineNumber = change.modifiedStartLineNumber;const endLineNumber = change.modifiedEndLineNumber || startLineNumber;// 根据不同的修改类型,定义影响的行范围switch (changeType) {case ChangeType.Add:return {range: {startLineNumber: startLineNumber, startColumn: 1,endLineNumber: endLineNumber, endColumn: 1},options: addedOptions};case ChangeType.Delete:return {range: {startLineNumber: startLineNumber, startColumn: 1,endLineNumber: startLineNumber, endColumn: 1},options: deletedOptions};case ChangeType.Modify:return {range: {startLineNumber: startLineNumber, startColumn: 1,endLineNumber: endLineNumber, endColumn: 1},options: modifiedOptions};}});return decorations;}
怎么使用:
// 计算 diff changesconst changesSave = computeDirtyDiff(originalLines, model);// 根据 changes 定义装饰器let decorations = generateDecorations(changesSave);// 将装饰器更新到编辑器中decorationsSave = model.deltaDecorations(decorationsSave || [], decorations);
别忘了 css:
.monaco-editor .dirty-diff-glyph {margin-left: 5px;cursor: pointer;z-index: 5;}.monaco-editor .dirty-diff-glyph:before {position: absolute;content: "";height: 100%;width: 0;left: -2px;transition: width 80ms linear,left 80ms linear;}.monaco-editor .margin-view-overlays>div:hover>.dirty-diff-glyph:before {position: absolute;content: "";height: 100%;width: 9px;left: -6px;}.monaco-diff-editor .dirty-diff-glyph {display: none;}/** delete **/.monaco-editor .dirty-diff-deleted:after {border-left: 4px solid #94151b;content: "";position: absolute;bottom: -4px;box-sizing: border-box;width: 4px;height: 0;z-index: 9;border-top: 4px solid transparent;border-bottom: 4px solid transparent;transition: border-top-width 80ms linear,border-bottom-width 80ms linear,bottom 80ms linear;pointer-events: none;}.monaco-editor .dirty-diff-deleted:before {background: #94151b;margin-left: 3px;height: 0;bottom: 0;transition: height 80ms linear;}.monaco-editor .margin-view-overlays>div:hover>.dirty-diff-deleted:after {bottom: 0;border-top-width: 0;border-bottom-width: 0;}/* add modify */.monaco-editor .dirty-diff-modified {border-left: 3px solid #0c7d9d;}.monaco-editor .dirty-diff-added {border-left: 3px solid #587c0c;}.monaco-editor .dirty-diff-modified:before {background: #0c7d9d;}.monaco-editor .dirty-diff-added:before {background: #587c0c;}/* peekview */.ubug-overlay {border-top: 1px solid #00BCD4;border-bottom: 1px solid #00BCD4;display: flex;flex-direction: column;}.ubug-overlay-name {font-weight: bold;}.ubug-overlay-title {background: #3b4448;color: #fff;display: flex;line-height: 20px;height: 20px;padding: 0 10px;justify-content: space-between;border-bottom: 1px solid #00bcd4;}.ubug-overlay-type-0{border-color: #0c7d9d;}.ubug-overlay-type-0 .ubug-overlay-title{border-bottom-color: #0c7d9d;}.ubug-overlay-type-1{border-color: #587c0c;}.ubug-overlay-type-1 .ubug-overlay-title{border-bottom-color: #587c0c;}.ubug-overlay-type-2{border-color: #94151b;}.ubug-overlay-type-2 .ubug-overlay-title{border-bottom-color: #94151b;}.ubug-overlay-editor {flex: auto;}.ubug-overlay-btns {display: flex;}.ubug-overlay-btn {font-size: 20px;line-height: 18px;opacity: .6;width: 20px;text-align: center;}.ubug-overlay-btn:hover {opacity: 1;}
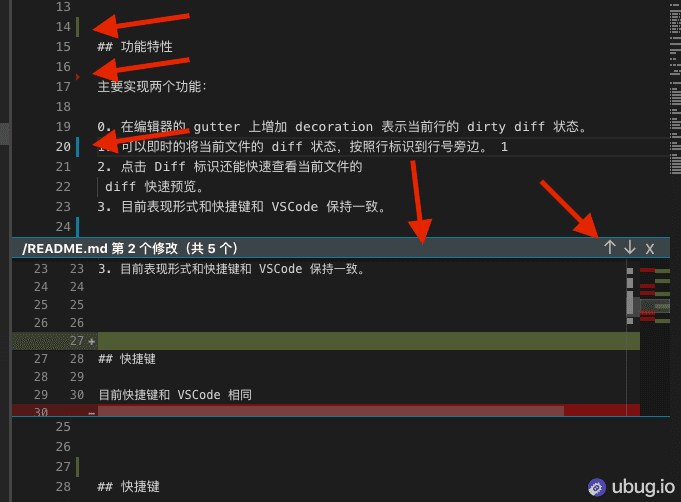
我们能得到这样的效果:
完成上面的效果其实已经能够有生产力的,不过一般的 dirtyDiff 功能都需要搭配点击查看的功能,也就是点击行首的标记,能够查看到具体哪些 dirty。
这个功能的实现也调研了很久,怎么才能在编辑器中嵌入一个 diff 编辑器呢?一番搜索之后发现了 OverlayWidget 和 ViewZone 这两个东西。
- ViewZone 是负责在编辑器内部行之间开启一片区域的editor.changeViewZones((changeAccessor) => {let viewZoneId = changeAccessor.addZone({afterLineNumber: endLineNum,suppressMouseDown: true,heightInLines: lineHeight + 1, // one more for the titledomNode: zoneNode,onDomNodeTop: top => {overlayDom.style.top = top + "px";},onComputedHeight: height => {overlayDom.style.height = height + "px";}});// editor.setPosition({ column: 1, lineNumber: endLineNum });editor.revealLineInCenter(endLineNum);// this.renderDiffEditorAtDom(editor, endLineNum, overlayDom);// this.overlays.push({ zone: viewZoneId, editor: editor, overlayWidget, index });});
- OverlayWidget 是负责在编辑器上添加一个 dom 节点的,然后手动追踪 zone 的位置和高度editor.addOverlayWidget({getId: () => `${path} - ${index}`,getDomNode: () => document.createElement('div'),getPosition: () => null});
使用这两个接口的原因是可以内嵌在编辑器的效果,不会随着滚动点击等变更。
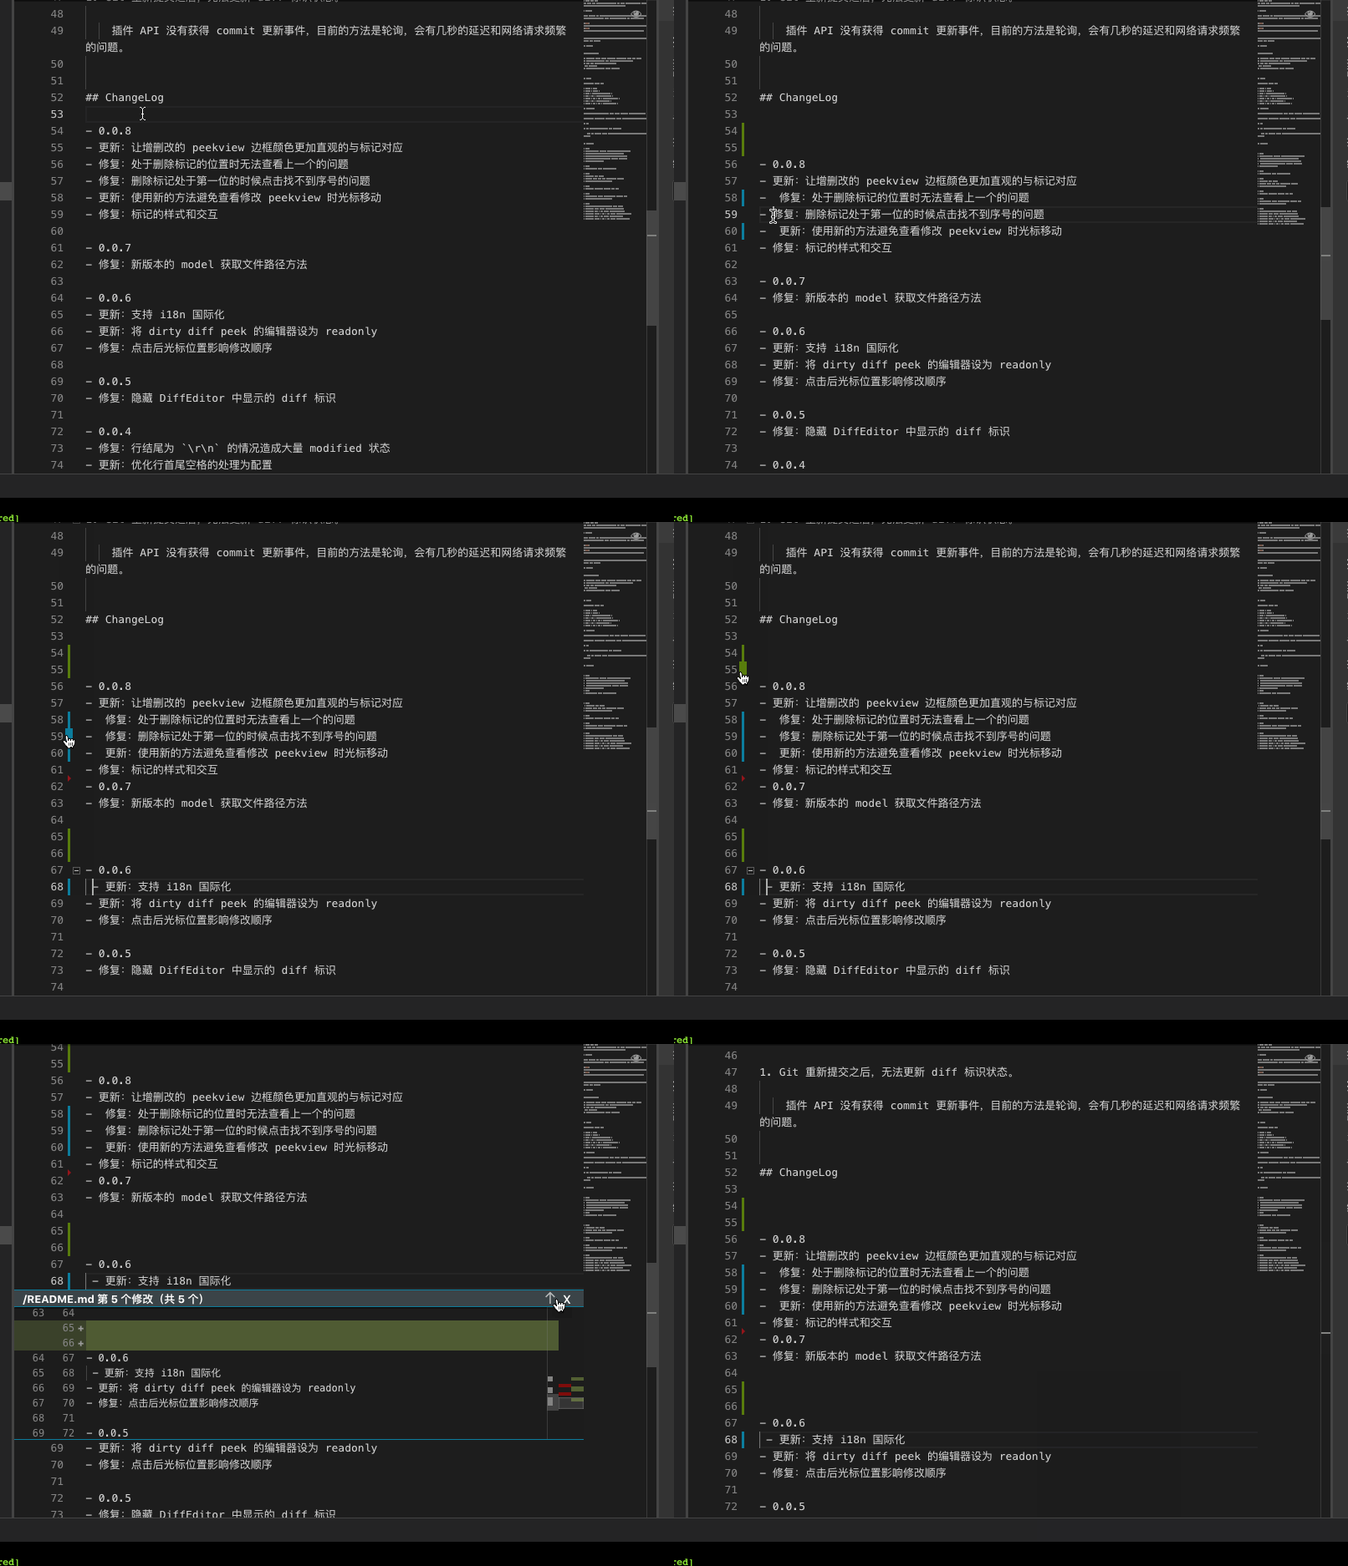
完整的效果:
// 编辑器点击监听,过滤特定绑定的 editor,目标是刚才添加的装饰器editor.onMouseDown((e) => {if (e.target.type === monaco.editor.MouseTargetType.GUTTER_LINE_DECORATIONS &&/dirty-diff/.test(e.target.element.className)) {const path = getPathFromModel(editor.getModel());const lineNumber = e.target.position.lineNumber;if (this.updaters[path]) {// 获取修改的位置const changeIndex = this.updaters[path].getChangeIndex(lineNumber);// 开辟一个区域放置 diff editorthis.renderOverlay(editor, changeIndex);}}});// 将快速预览的基础 dom 注入到 editor 中renderOverlay = (editor: monaco.editor.IStandaloneCodeEditor, ind: number) => {this.cleanOverlay();const path = getPathFromModel(editor.getModel());const { endLineNum, linesNum, changesNum, index, changeType } = this.updaters[path].getChangeInfo(ind);let lineHeight = linesNum * 2 + 3 * 2; // 保证查看 diff 后上下还有三行lineHeight = lineHeight > 14 ? 14 : (lineHeight < 8 ? 8 : lineHeight);this.peekViewIndex = { path, ind, changesNum };// peek View 上的一些点击功能const onAddCommit: any = null; // () => { console.log('提交功能待定'); } // command.executeCommand('Git.Commit', '');const onCloseCommit = () => { this.cleanOverlay(); }const onPrevIndex = () => { this.showPrevChange(); }const onNextIndex = () => { this.showNextChange(); }// 准备一个 dom 节点let overlayDom = prepareOverlayWidget(index, changesNum, changeType, path, onAddCommit, onPrevIndex, onNextIndex, onCloseCommit);// 修正并跟踪宽度,不会超过 minimap 的位置fixOverlayWidth(editor.getLayoutInfo(), overlayDom);// 添加 overlay widgetlet overlayWidget: monaco.editor.IOverlayWidget = {getId: () => `${path} - ${index}`,getDomNode: () => overlayDom,getPosition: () => null};editor.addOverlayWidget(overlayWidget);// 添加 view zone,跟踪高度和位置let zoneNode = createDivWithClass(null, null, null, { background: '#8effc9' });editor.changeViewZones((changeAccessor) => {let viewZoneId = changeAccessor.addZone({afterLineNumber: endLineNum,suppressMouseDown: true,heightInLines: lineHeight + 1, // one more for the titledomNode: zoneNode,onDomNodeTop: top => {overlayDom.style.top = top + "px";},onComputedHeight: height => {overlayDom.style.height = height + "px";}});// editor.setPosition({ column: 1, lineNumber: endLineNum });// 让目标行自动到编辑器中央editor.revealLineInCenter(endLineNum);// 在 overlay 的节点上添加 diff editorthis.renderDiffEditorAtDom(editor, endLineNum, overlayDom);this.overlays.push({ zone: viewZoneId, editor: editor, overlayWidget, index });});}
至此,完成了点击装饰器查看具体差异对比的效果
包括之前的几个功能:textmate、LSP 和这个 DirtyDiff 功能,写成文字之后发现很多并不复杂,流程也很清晰,但是当初确实花了很多的时间去找实现、调试运行,最终很艰难的才达成想要的效果。所以一个不熟悉的领域如果实现某些业务,知道想要的效果但是真的没有一点头绪,确实需要花费很多的精力来补充相关的能力,最后才能不费力的说出其中的原理和实现。
这些东西如果交给不熟悉的人做,需要花费很多的时间调研其中的每个概念,所以经验确实是不可替代的。不过对于我来说,找资料、看源码到深夜,然后把效果成功实现的欣喜很难忘记~~
WorkPad WebIDE 的一系列文章写了这些,涵盖了值得说的部分,研究比较多的地方,除此之外还有很多细枝末节、花了很多精力的地方、都没有涉及,不是不值得说,毕竟不可能面面俱到。目前先写这些,更多的内容等有时间归档下再形成文字~
感谢您的阅读,本文由 Ubug 版权所有。如若转载,请注明出处:Ubug(https://ubug.io/blog/workpad-part-7)


